 Goompaolo9500
- Posts : 6
Join date : 2020-06-24
 Creating Character Fields for PPVS2
Wed Jun 24, 2020 6:25 am
Note:
Inspired from JonNobo's tutorial. You can still see it here: https://puyonexus.com/forum/viewtopic.php?f=7&t=2733
Just a simplified tutorial on how to create character fields for PPVS2. I recommend GIMP for this tutorial.
For those who use GIMP:
1.Open GIMP and create a new image with a width of 340 and a height of 600.

And make sure you add alpha channel under Layer-->Transparent.
2.Prepare the following layers in the following order:
-Character
-The Base Image of your character. Set the opacity to 70 for this layer.
-Character Fill
-Character Outline
-The outline of your character. Set the opacity to 30 for this layer.
-Base Field
-The base field for your character. You can use the Puyo 20th Styled Base Field, but you can also use the Puyo Puyo 15th/Puyo Puyo 7 Base Field. Make sure it fits the whole image.

3.Add your own character image.
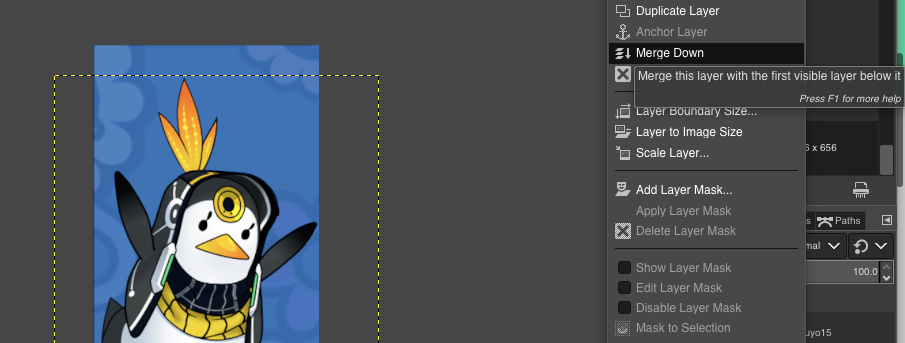
-It can be your favorite character, whether it's a Puyo Puyo character or not. Make sure to resize your character so that the character can fit the image. In my case, I choose Chuni-Penguin from Chunithm.

Once satisfied, you can merge the character image down to the character layer.

4.Colorize the base field to match the color of your character. Colorize using Colors-->Hue-Saturation. Adjust the hue to match the color of your character.

5.Select the entire area around your character, then invert the selection with Ctrl+I (Command+I for Macs).
It should look like this:

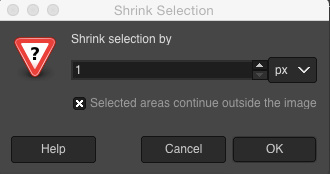
6.Now go to Select-->Shrink and shrink the selection by 2 or 3 pixels. Make sure you turn on the "Selected areas continue outside the image" option.

7.Use the color picker to set the foreground color to the desired color of the base frame like so:

And then, go to the Character Fill layer and simply fill the selection using the paint bucket tool so that you won't see the field through your character.

Make sure that the affected area is set to fill the whole selection on the tool settings.
8.Now grow the selection by 6 or 8 pixels, feather selection by 3 pixels, and change the foreground color to white.

9.And finally, go to the Charater Outline layer, simply fill the selection, and you are done!
[
10.Once you are all done, export the image as PNG with the following settings:

How to use the finished frame for Puyo Puyo VS 2:
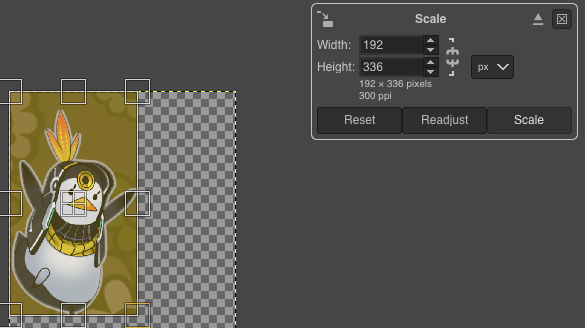
(Useful if your frame is larger than 192x336)
1.Resize the finished image to 192x336

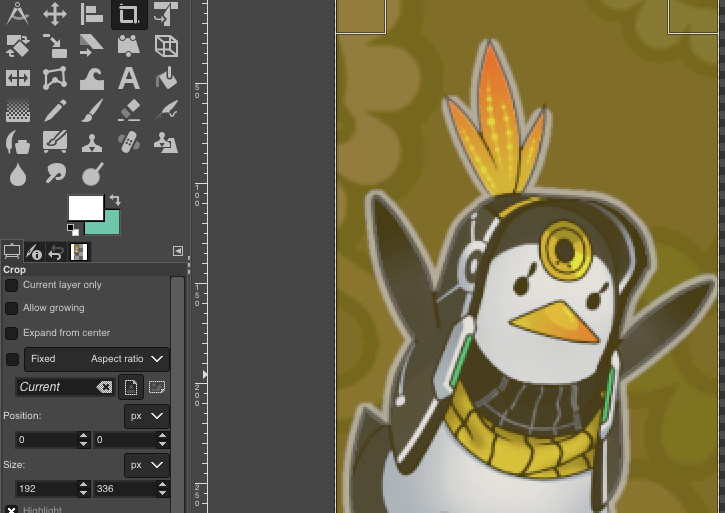
2.Using the crop tool, crop the image to exactly 192x336 and export the image as "frame.png"
*Make sure that the "Current Layer only" option is turned off from the tool setting.

And this is how will it look like:

That's all, and good luck making your own!
Inspired from JonNobo's tutorial. You can still see it here: https://puyonexus.com/forum/viewtopic.php?f=7&t=2733
Just a simplified tutorial on how to create character fields for PPVS2. I recommend GIMP for this tutorial.
For those who use GIMP:
1.Open GIMP and create a new image with a width of 340 and a height of 600.

And make sure you add alpha channel under Layer-->Transparent.
2.Prepare the following layers in the following order:
-Character
-The Base Image of your character. Set the opacity to 70 for this layer.
-Character Fill
-Character Outline
-The outline of your character. Set the opacity to 30 for this layer.
-Base Field
-The base field for your character. You can use the Puyo 20th Styled Base Field, but you can also use the Puyo Puyo 15th/Puyo Puyo 7 Base Field. Make sure it fits the whole image.

3.Add your own character image.
-It can be your favorite character, whether it's a Puyo Puyo character or not. Make sure to resize your character so that the character can fit the image. In my case, I choose Chuni-Penguin from Chunithm.

Once satisfied, you can merge the character image down to the character layer.

4.Colorize the base field to match the color of your character. Colorize using Colors-->Hue-Saturation. Adjust the hue to match the color of your character.

5.Select the entire area around your character, then invert the selection with Ctrl+I (Command+I for Macs).
It should look like this:

6.Now go to Select-->Shrink and shrink the selection by 2 or 3 pixels. Make sure you turn on the "Selected areas continue outside the image" option.

7.Use the color picker to set the foreground color to the desired color of the base frame like so:

And then, go to the Character Fill layer and simply fill the selection using the paint bucket tool so that you won't see the field through your character.

Make sure that the affected area is set to fill the whole selection on the tool settings.
8.Now grow the selection by 6 or 8 pixels, feather selection by 3 pixels, and change the foreground color to white.

9.And finally, go to the Charater Outline layer, simply fill the selection, and you are done!
[

10.Once you are all done, export the image as PNG with the following settings:

How to use the finished frame for Puyo Puyo VS 2:
(Useful if your frame is larger than 192x336)
1.Resize the finished image to 192x336

2.Using the crop tool, crop the image to exactly 192x336 and export the image as "frame.png"
*Make sure that the "Current Layer only" option is turned off from the tool setting.

And this is how will it look like:

That's all, and good luck making your own!
 StrawberryPuyo Player
- Posts : 36
Join date : 2020-09-30
Location : Canada
 Re: Creating Character Fields for PPVS2
Thu Oct 01, 2020 3:33 pm
Thank you 
 PuyoRiderZ
- Posts : 31
Join date : 2018-02-22
Location : Singapore
 Re: Creating Character Fields for PPVS2
Sun Oct 04, 2020 9:02 am
That looks cool. Now can you please show us how to create character fields using Paint.NET?
 1/2
1/2- Posts : 6
Join date : 2020-07-26
 How to make a character field for Puyo Puyo VS 2
Thu May 20, 2021 1:12 am
So I used paint.NET and pyrochild's plugins to make it.
If you don't have them, download:
paint.NET: https://www.getpaint.net (or: https://download.cnet.com/Paint-NET/3000-2192_4-10338146.html )
pyrochild's plugins: https://forums.getpaint.net/topic/7291-pyrochild-plugins-2020-11-21/#google_vignette
First of all, I painted Roblox Noob in paint.net and copy it into new layer in front of the field base.
Then, I set the layer opacity into 128 and use "Outline Object" plugin and set up like this:
I made one of the examples and insert softness: 198 and width: 10 and here is the result:

red_artwork.pdn screenshot
It works well with this plugin.
So I outlined Roblox Noob with width: 5, softness: 198 and white color of outline.
Also, I made the field darker by adding layer, color it dark blue and set the layer opacity into 128.
Finally, I flatten those layers together and here is the result:

The results are awesome! I like it.
I made a download link for this mod (remade by me).
https://gamebanana.com/mods/229035
If you don't have them, download:
paint.NET: https://www.getpaint.net (or: https://download.cnet.com/Paint-NET/3000-2192_4-10338146.html )
pyrochild's plugins: https://forums.getpaint.net/topic/7291-pyrochild-plugins-2020-11-21/#google_vignette
First of all, I painted Roblox Noob in paint.net and copy it into new layer in front of the field base.
Then, I set the layer opacity into 128 and use "Outline Object" plugin and set up like this:
I made one of the examples and insert softness: 198 and width: 10 and here is the result:

red_artwork.pdn screenshot
It works well with this plugin.
So I outlined Roblox Noob with width: 5, softness: 198 and white color of outline.
Also, I made the field darker by adding layer, color it dark blue and set the layer opacity into 128.
Finally, I flatten those layers together and here is the result:

The results are awesome! I like it.
I made a download link for this mod (remade by me).
https://gamebanana.com/mods/229035
Permissions in this forum:
You cannot reply to topics in this forum
